How to Use the Service Catalog Demo
This guide demonstrates the complete service delivery workflow through two user perspectives: requesting services through the catalog and managing them through Infrahub. You'll see how automated provisioning transforms service requests into fully configured network services.
Need help or have questions? Join our Discord community for support!https://discord.gg/opsmillPrerequisites
Before starting, ensure you have:
- Completed the installation guide
- Both services running:
- Service Catalog at
http://localhost:8501 - Infrahub at
http://localhost:8000
- Service Catalog at
Understanding the workflow
The demo simulates a typical enterprise service delivery process:
- Service Request: Customer/engineer requests a service through self-service portal
- Automatic Processing: Infrahub generates proposed changes with allocated resources
- Review & Approval: Network architect reviews and approves the implementation
- Resource Allocation: System automatically provisions VLANs, IPs, and configurations
- Service Delivery: Customer receives access details for their new service
- Automated Deployment: Semaphore runs Ansible playbooks to fetch generated configurations from Infrahub and deploy them to network devices
Step 1: Request a new service (service engineer role)
Understanding the service catalog interface
The Service Catalog provides a simplified, user-friendly interface for requesting network services without requiring deep technical knowledge.
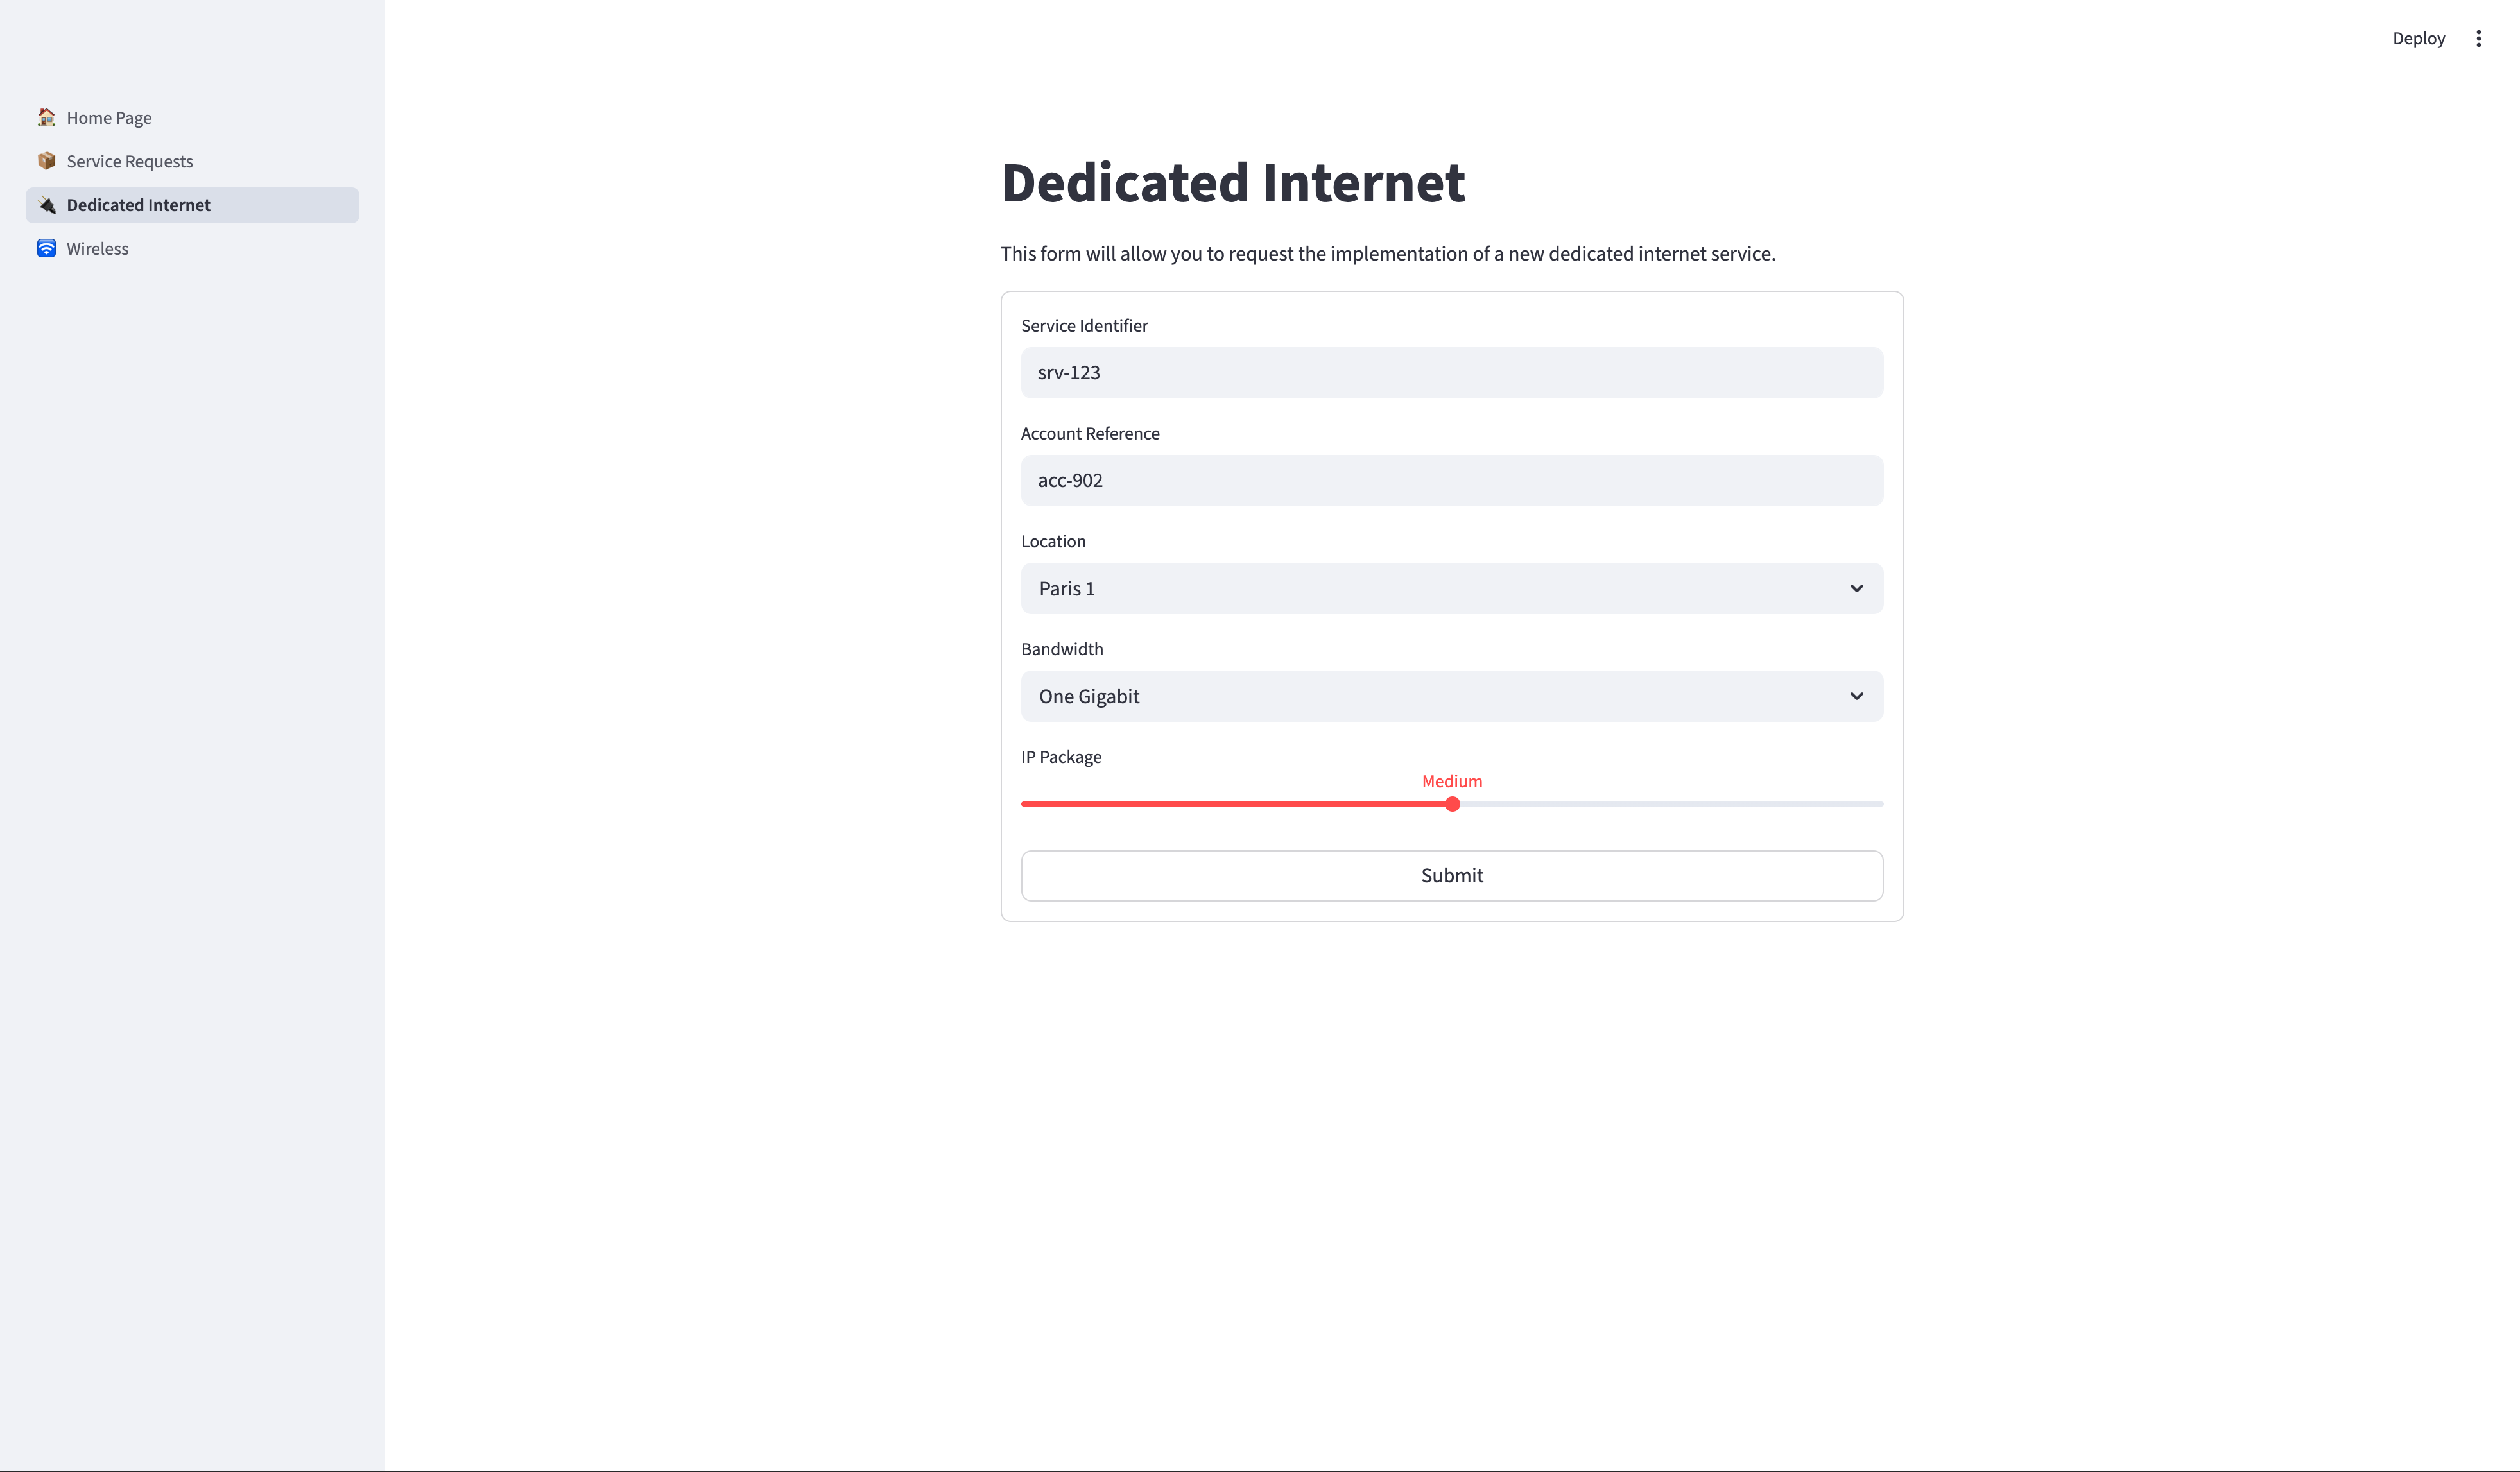
Create a dedicated internet service request
-
Access the Service Catalog
- Open your browser to
http://localhost:8501 - You'll see the main dashboard with available service types
- Open your browser to
-
Navigate to Service Creation
- Click on the "🔌 Dedicated Internet" card from the home page
- Or use the sidebar navigation to go to "Dedicated Internet"
-
Fill Out the Service Request Form
The form presents user-friendly options that hide technical complexity:
-
Service Identifier: Choose a unique name (for example: "DI-DEMO-001")
-
Account Reference: Customer or project identifier
-
Location: Select a site within a location (for example: "Paris 1", "Brussels 1", "New York 1", "Dallas 1")
-
Bandwidth: Choose from human-readable options:
- "Ten Gigabits" (10 Gbps)
- "One Gigabit" (1 Gbps)
- "Hundred Megabits" (100 Mbps)
-
IP Package: Select based on customer needs:
- "Small" (6 usable IPs)
- "Medium" (14 usable IPs)
- "Large" (30 usable IPs)
-
-
Submit the Request
- Click "Submit" to create the service request
- The system creates a new branch in Infrahub for this change
When you submit the request:
- A new git branch is created in Infrahub
- The service object is created with "draft" status
- A generator is triggered to allocate resources
- A "Proposed Change" is created for review
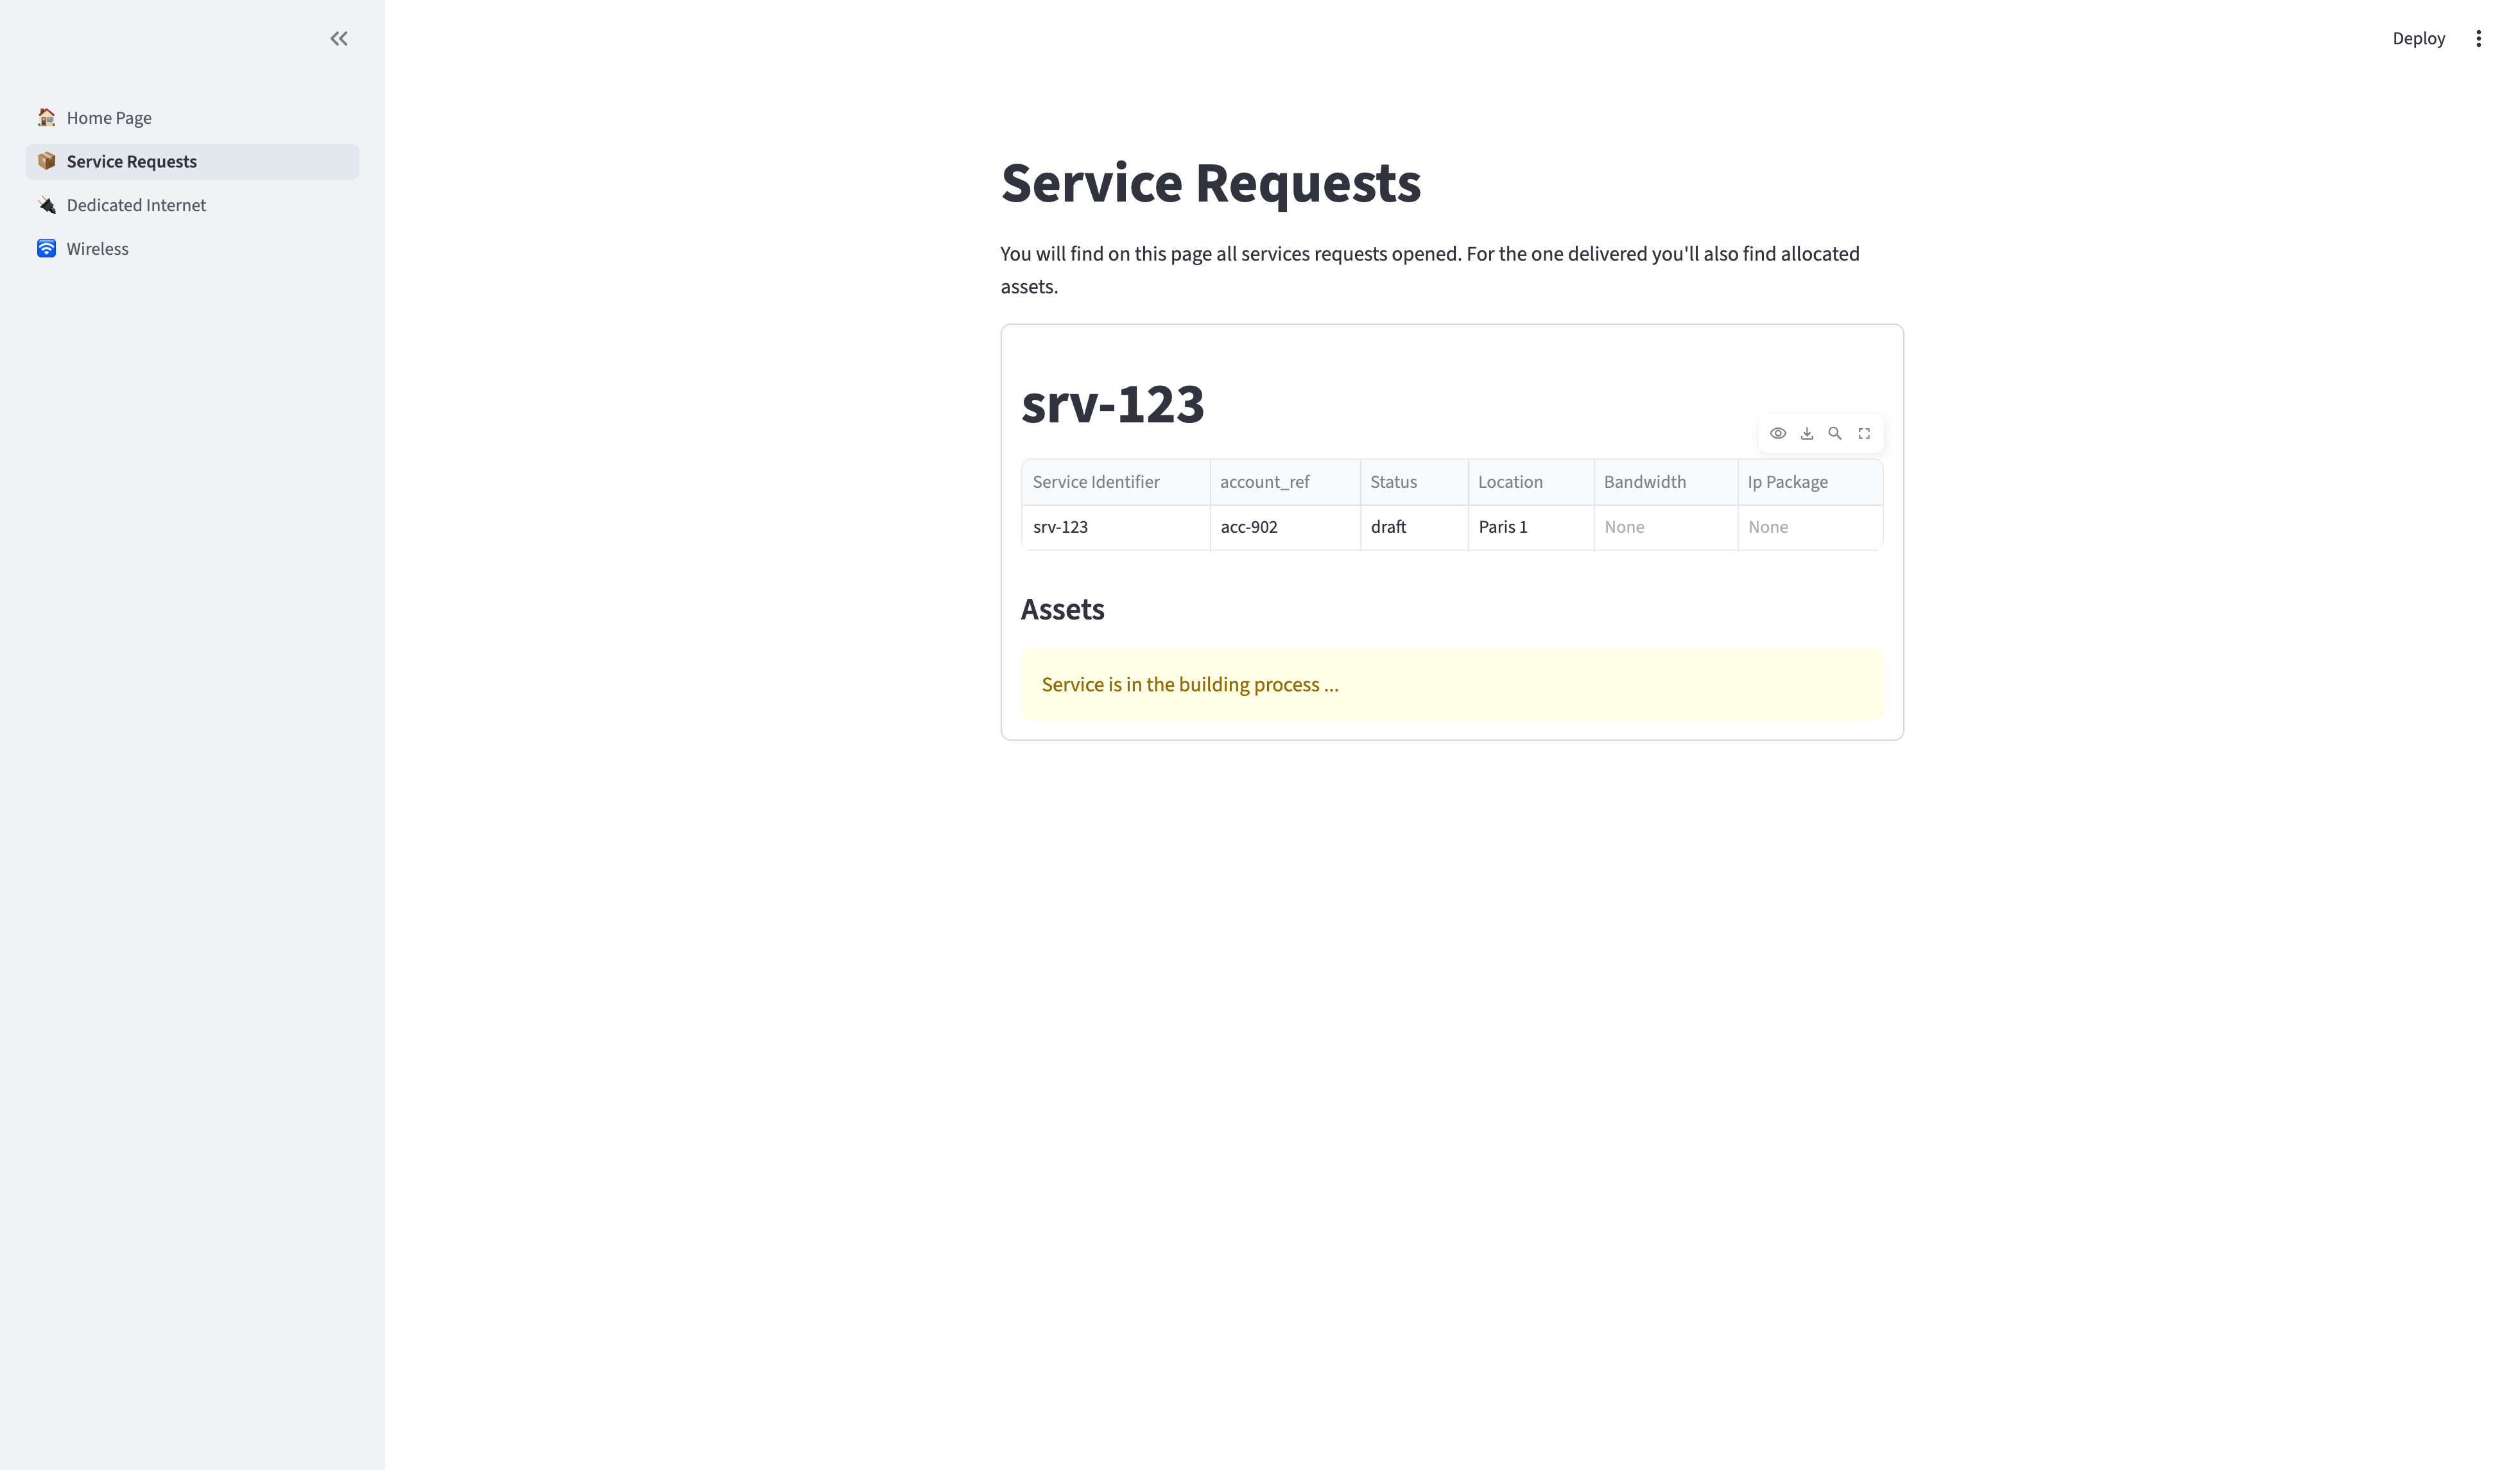
Track your service requests
-
View All Requests
- Navigate to "📦 Service Requests" in the sidebar
- You'll see a table of all service requests with their current status
-
Monitor Request Progress
The table shows key information:
- Service ID: Your unique identifier
- Status: Current state (Draft, In Delivery, Active)
- Location: Where the service will be deployed
- Bandwidth & IP Package: Technical specifications
- Account: Customer reference
-
Understanding Status Progression
- Draft: Initial request submitted, awaiting processing
- In Delivery: Resources allocated, implementation in progress
- Active: Service fully provisioned and operational
In this example, the Service Request is in Draft state.
The Service Catalog provides a simplified view for business users, while Infrahub offers detailed technical views for network engineers. This separation allows each role to work with appropriate tools.
Step 2: Review infrastructure state (network architect role)
Understanding Infrahub's role
Infrahub serves as the "source of truth" for your network infrastructure, maintaining detailed models of:
- Physical locations and equipment
- Network configurations and relationships
- Service allocations and dependencies
- Change history and version control
Access the Infrahub interface
-
Log into Infrahub
- Navigate to
http://localhost:8000 - Username:
admin - Password:
infrahub
- Navigate to
-
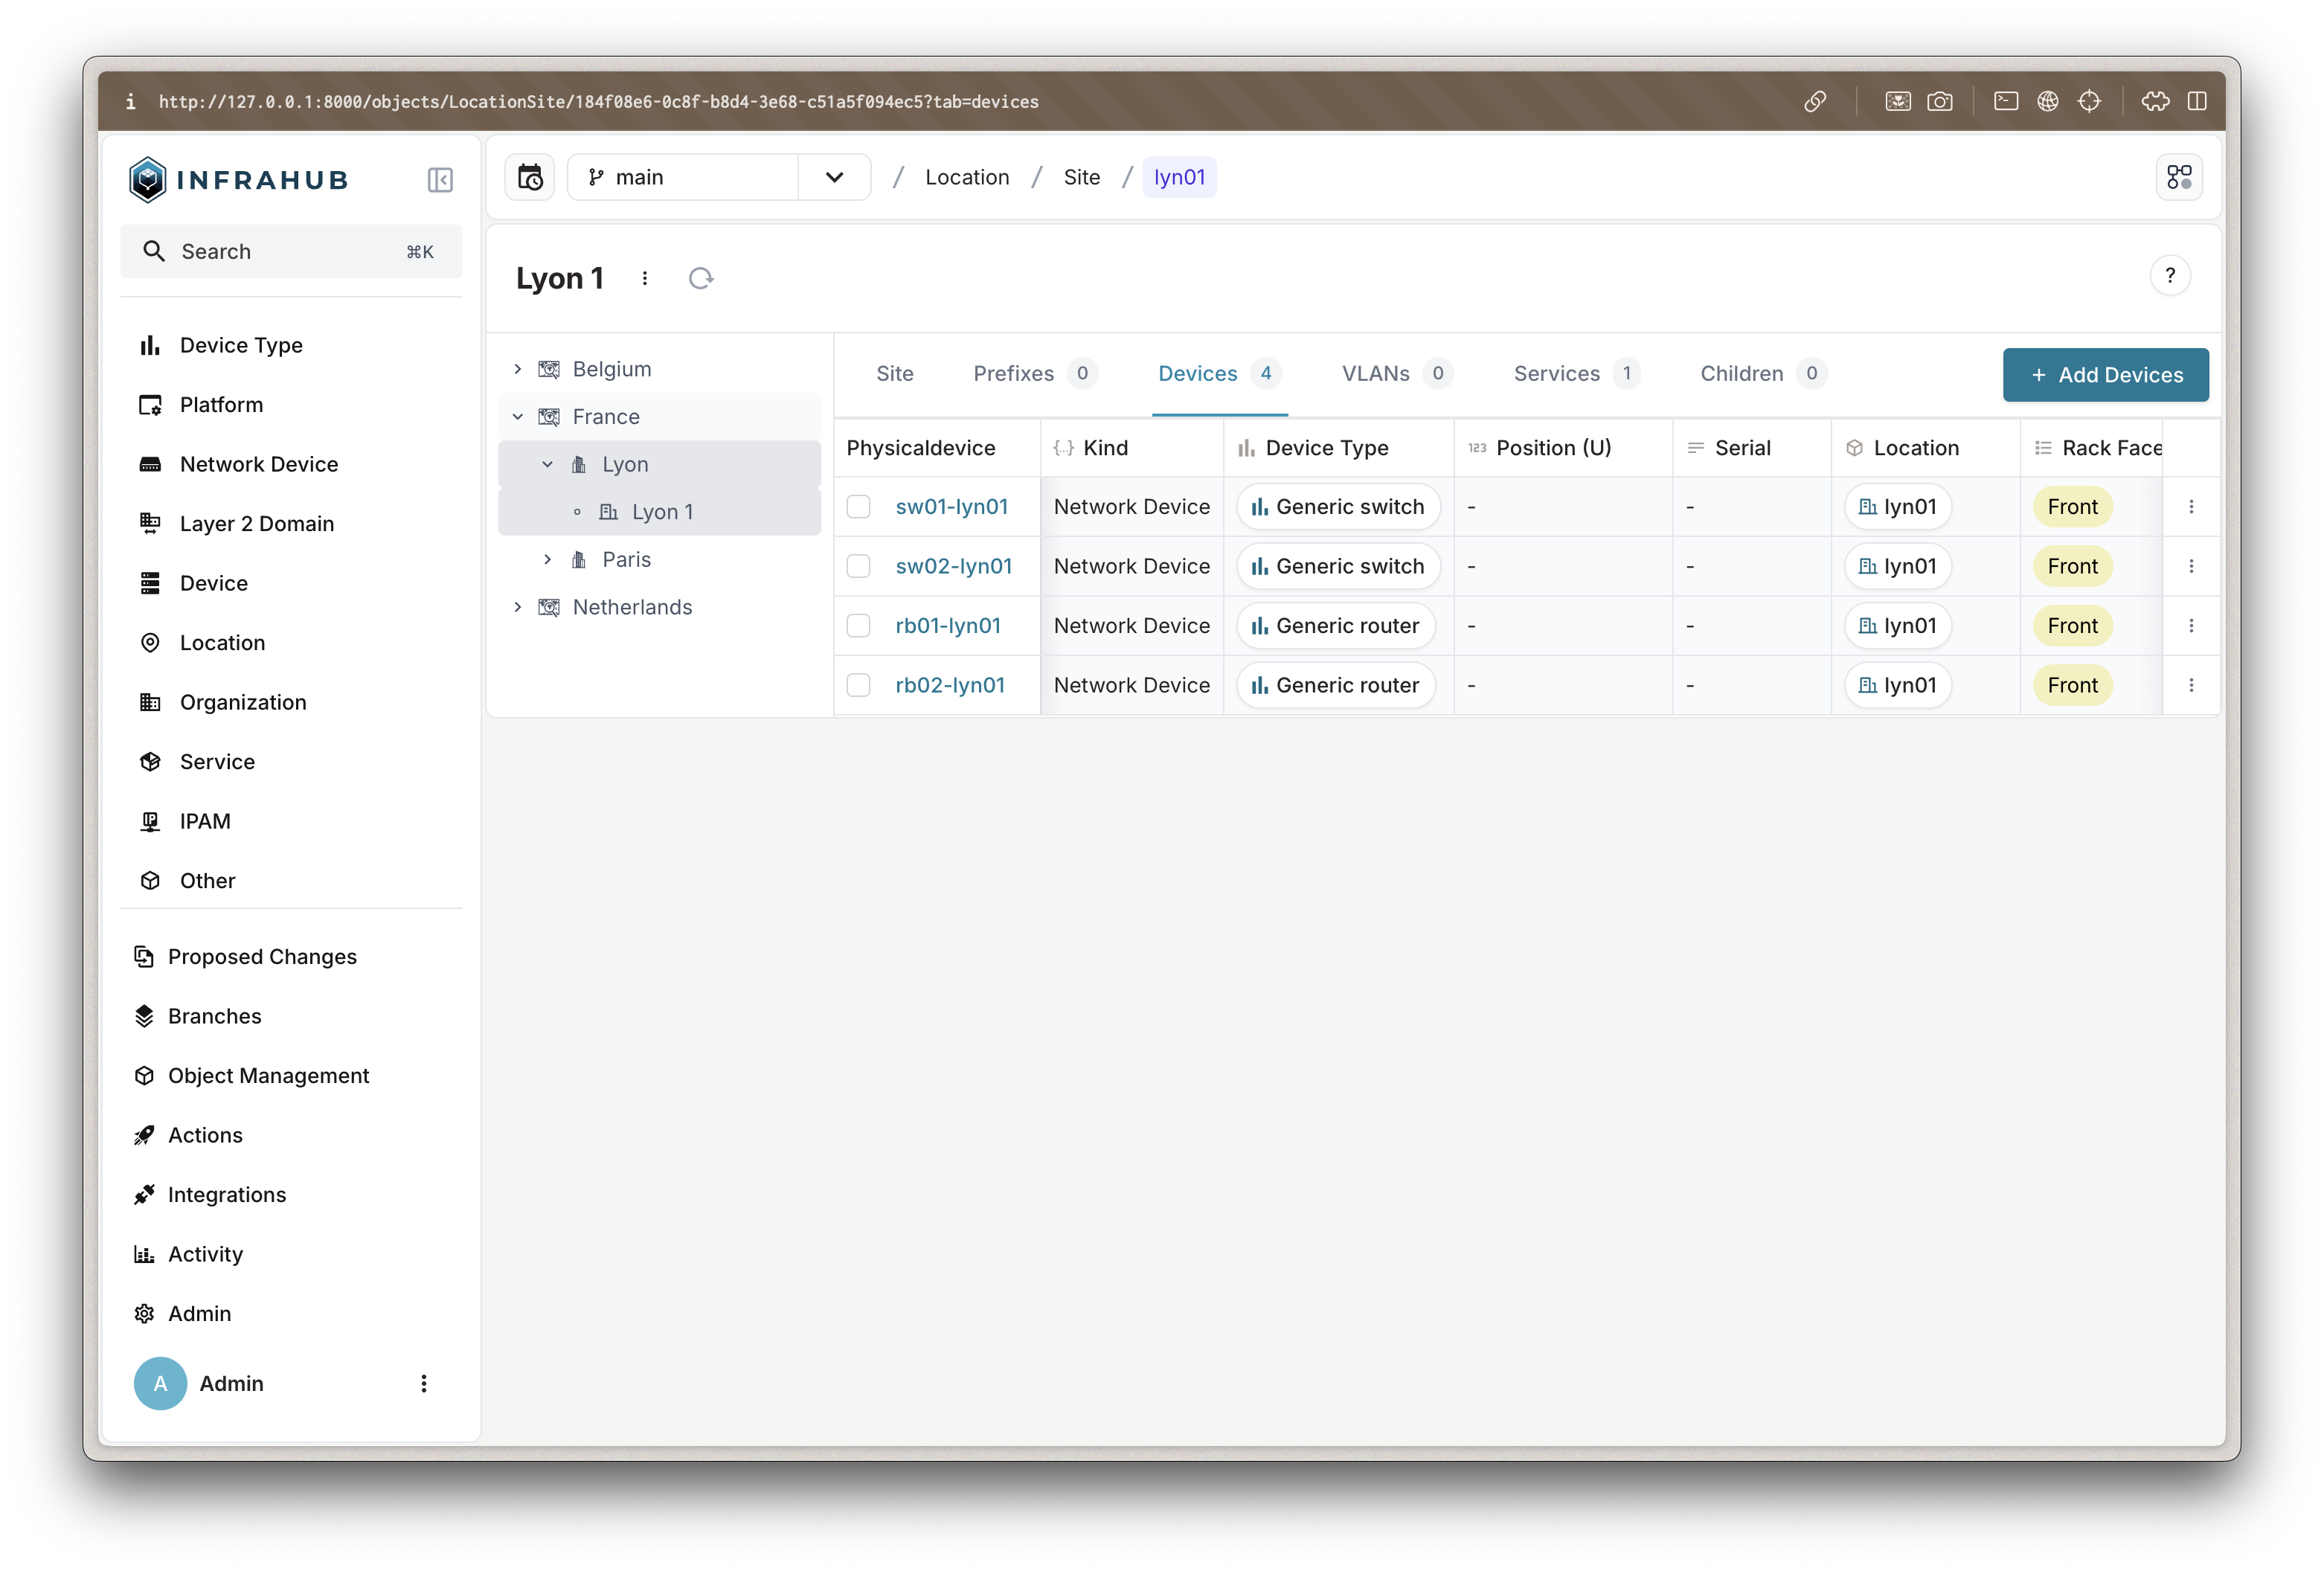
Explore the Infrastructure Model
The left sidebar organizes infrastructure data by category:
Locations
- Countries, metros, and sites
- Geographic hierarchy for service placement
DCIM (Data Center Infrastructure Management)
- Devices (switches, routers, servers)
- Interfaces and connections
- Hardware specifications
IPAM (IP Address Management)
- IP prefixes and addresses
- VLANs and L2 domains
- Resource pools for allocation
Services
- Service definitions and instances
- Resource assignments
- Customer relationships
-
Examine Site Details
- Click
Location>Siteto see all sites - Select a site (for example: "Paris 1")
- Review the site's components:
- Associated devices and their roles
- Current VLAN assignments
- Available resource pools
- Existing services
- Click
By modeling infrastructure in Infrahub:
- All changes are version-controlled
- Relationships between components are maintained
- Resource conflicts are automatically prevented
- Changes can be tested before implementation
Review and approve service implementation
-
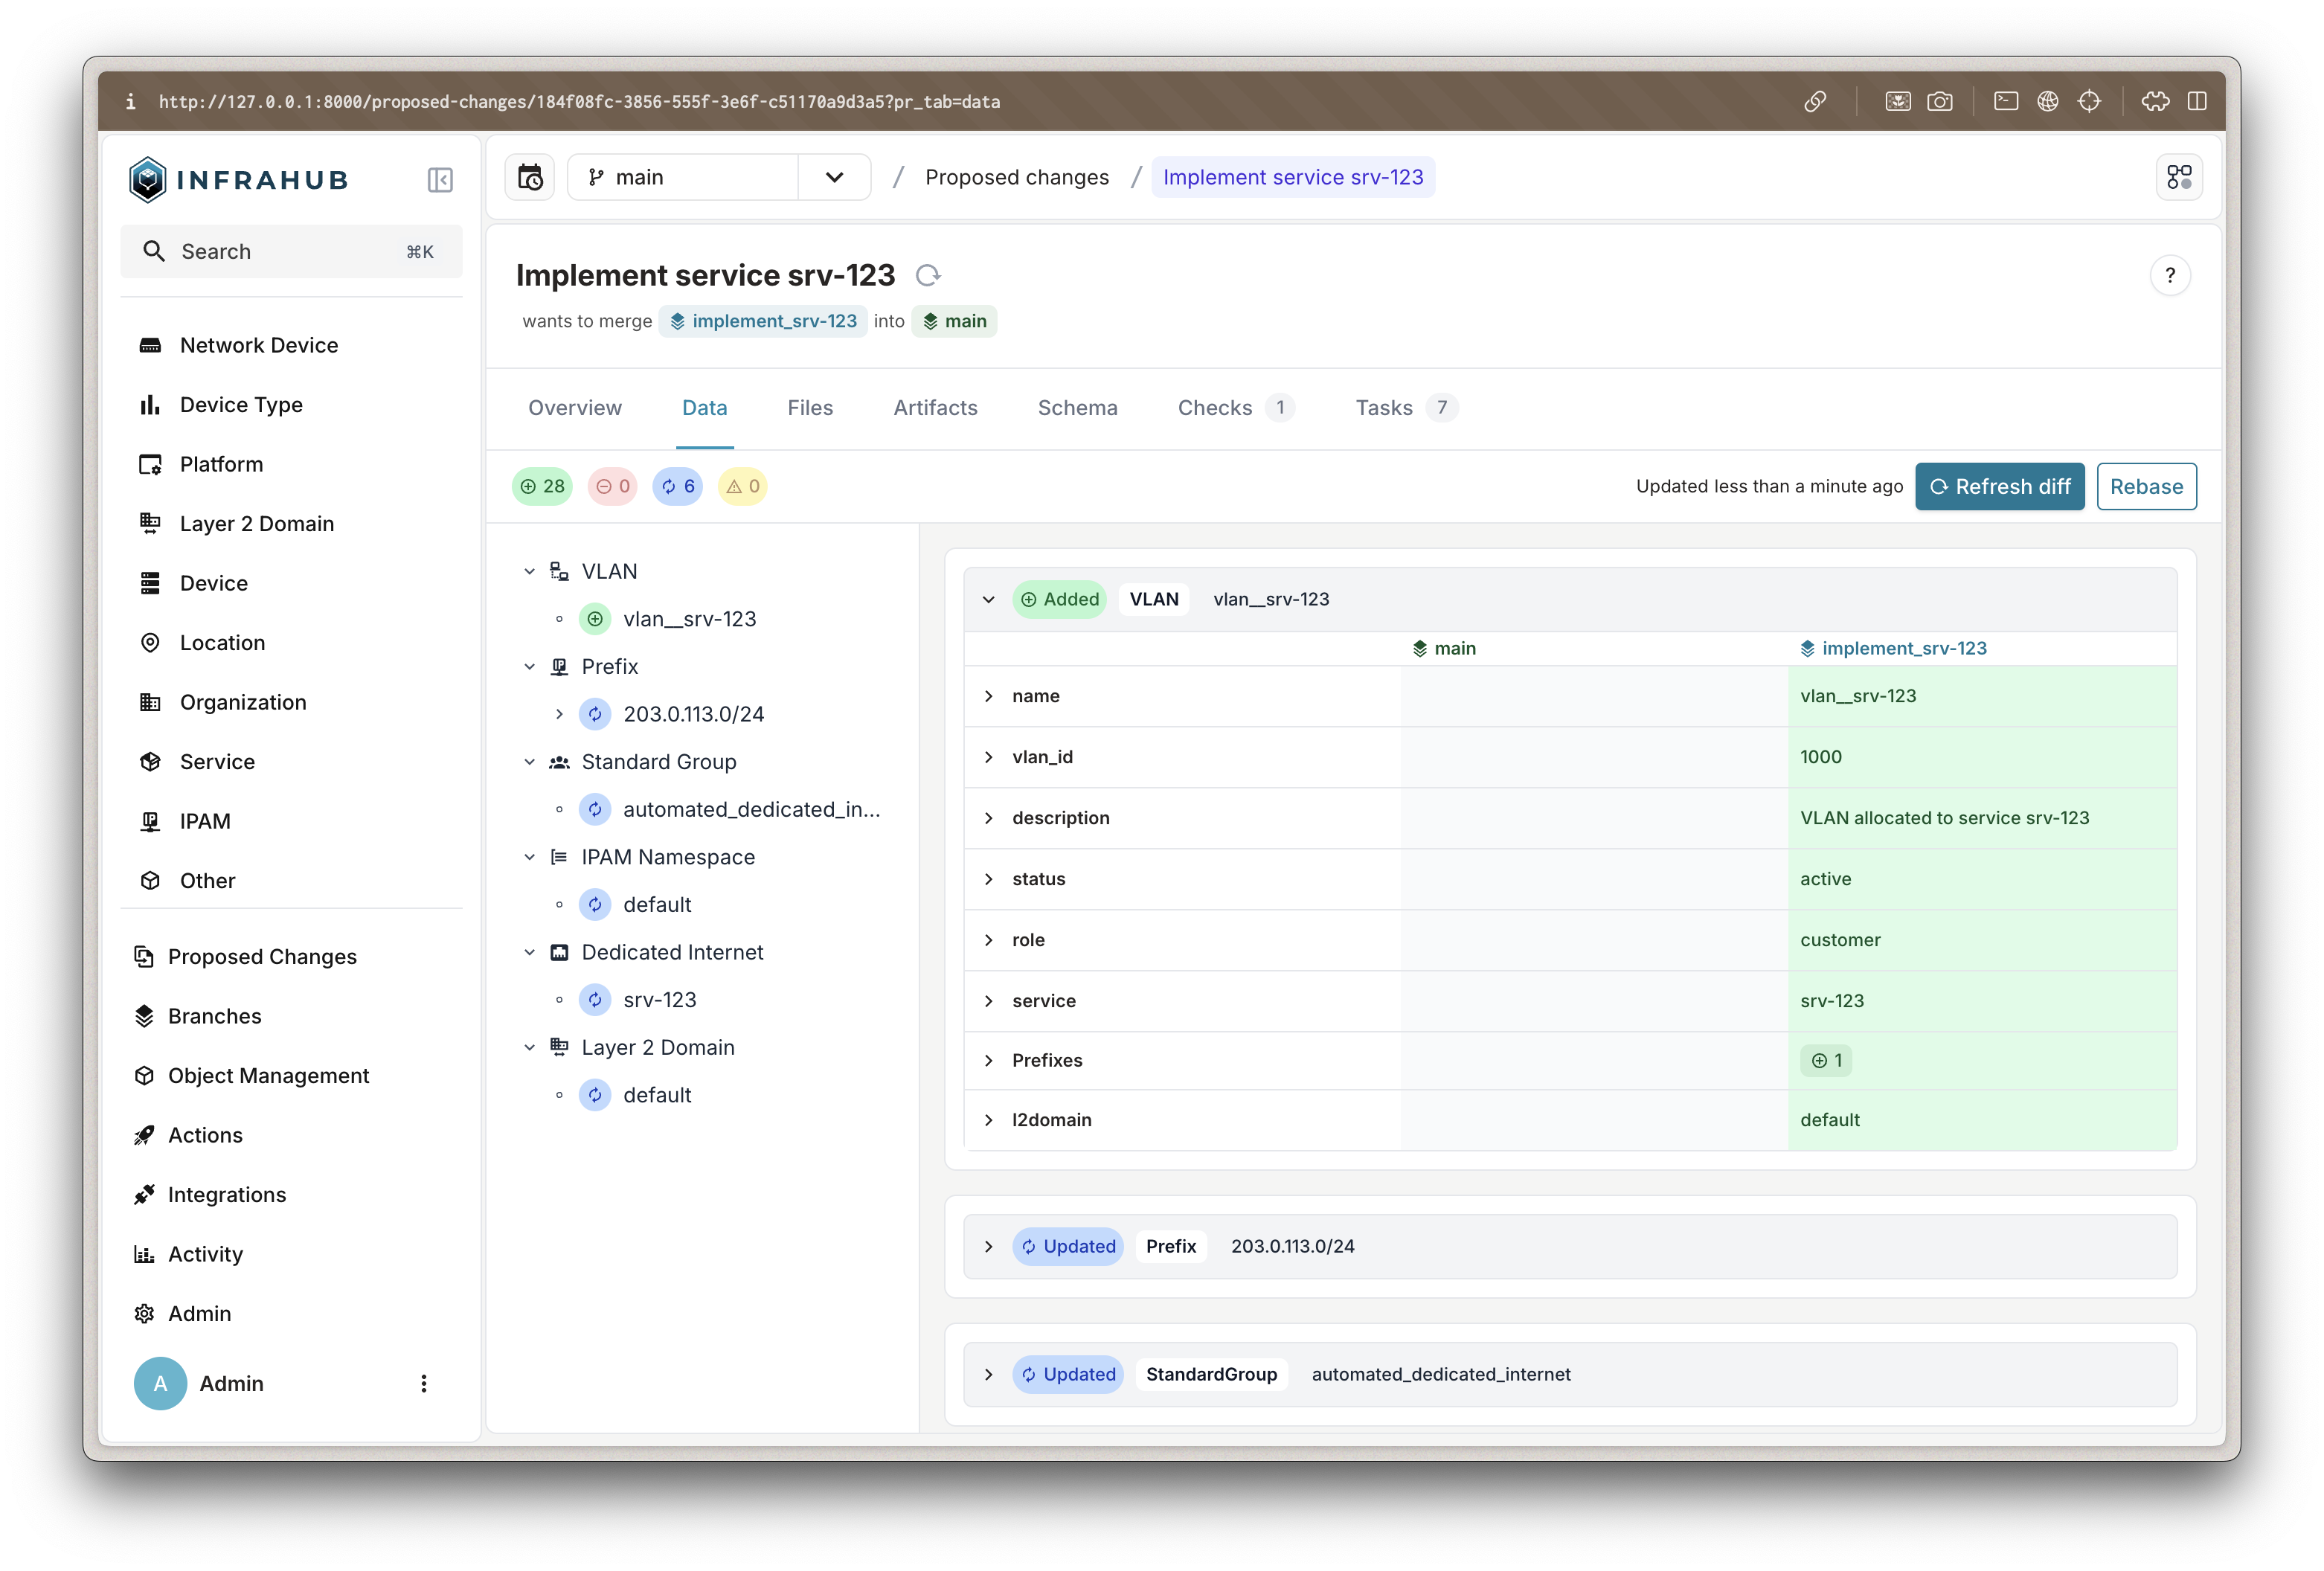
Access Proposed Changes
- Navigate to
Proposed Changesin the left sidebar - You'll see the service request you created earlier
- Each request creates a separate branch for safe testing
- Navigate to
-
Examine the Automated Provisioning
Click on your service request to see detailed tabs:
Overview Tab
- Summary of the proposed change
- Author and timestamp information
- Current status and available actions
Checks Tab
- Automated validation results
- Generator execution status (should show success)
- Any constraint violations or conflicts
Data Tab
- Original service request data
- Your form inputs (location, bandwidth, etc.)
- Service metadata and relationships
-
Review Resource Allocation
- Click "Refresh Diff" to see what the generator created
- Examine the provisioned resources:
VLAN Assignment
New VLAN: vlan__DI-DEMO-001ID: 142 (allocated from pool)Role: customerStatus: activeIP Prefix Allocation
New Prefix: 10.0.42.0/28Gateway: 10.0.42.1Usable IPs: 10.0.42.2 - 10.0.42.14Interface Configuration
Switch Port: ge-0/0/5 on core-switch-1Speed: 1000 MbpsVLAN: 142 (untagged)Status: activeRouter Interface
Interface: vlan_142 on edge-router-1IP Address: 10.0.42.1/28Status: active -
Approve the Implementation
- Return to the "Overview" tab
- Review the summary of changes
- Click "Merge" to approve and implement
- The branch merges into main, making changes live
This review process provides:
- Safety: Changes tested in isolation before going live
- Visibility: Full resource allocation visible before approval
- Audit Trail: Complete history of who approved what and when
- Rollback: Ability to revert changes if issues arise
Step 3: Verify service delivery
Confirm active service
-
Check Service Status
- Return to the Service Catalog (
http://localhost:8501) - Navigate to "Service Requests"
- Your service should now show "Active" status
- Return to the Service Catalog (
-
Review Allocated Resources
- In Infrahub, navigate to the service under
Service>Dedicated Internet - Click on your service to see all allocated components
- Verify relationships to VLANs, interfaces, and IP addresses
- In Infrahub, navigate to the service under
-
Understand the Customer Experience
At this point, a real customer would receive:
- Connection Details: Switch port and patch panel location
- IP Configuration: Gateway IP, subnet mask, and usable IP range
- VLAN Information: VLAN ID for their traffic
- Support Contacts: Who to contact for service issues
Step 4: Deploy the configurations
After the proposed change is merged, you can use Semaphore to deploy the generated configurations to network devices.
Access the Semaphore UI
-
Open Semaphore
- Navigate to
http://localhost:3000 - Username:
admin - Password:
semaphore
- Navigate to
-
Locate the Deployment Task
- Find the deployment project in the Semaphore dashboard
- The project is configured with the
deploy.ymlplaybook and the dynamic Infrahub inventory
Run the deployment playbook
-
Start a Task Run
- Click "Run" to launch the deployment playbook
- Semaphore uses the dynamic inventory plugin to query Infrahub for all devices and their attributes
-
Monitor Real-Time Output
- Watch the live output as Ansible connects to each device
- The playbook fetches the
startup-configartifact from Infrahub for each device - Configurations are saved locally (and in a real environment, pushed to devices)
-
Verify Deployment Success
- Check that all tasks complete with "ok" or "changed" status
- Review the output for any errors or skipped hosts
- Confirm that configuration files were generated for each device
The deploy.yml playbook performs two tasks per device:
- Fetch configuration artifact — Uses the
opsmill.infrahub.artifact_fetchmodule to retrieve thestartup-configartifact from Infrahub - Save configuration — Writes the configuration to a local file for deployment
You've successfully:
- ✅ Requested a service through the self-service portal
- ✅ Reviewed the automated resource allocation
- ✅ Approved the implementation as a network architect
- ✅ Delivered a fully configured network service
- ✅ Deployed configurations to network devices via Semaphore
All in minutes, with zero manual configuration errors!
Key takeaways
Business benefits
- Speed: Service delivery in minutes instead of days/weeks
- Consistency: Standardized configurations eliminate human error
- Self-Service: Reduces bottlenecks and improves customer satisfaction
- Visibility: Complete audit trail and resource tracking
Technical benefits
- Resource Management: Automatic allocation prevents conflicts
- Version Control: All changes tracked and reversible
- Validation: Automated checks prevent invalid configurations
- Integration: API-driven architecture enables broader automation
Next steps
Now that you understand the user experience:
- Explore the developer walkthrough to understand the technical implementation
- Try creating additional service types or modifying existing ones
- Consider how similar patterns could apply to your organization's services